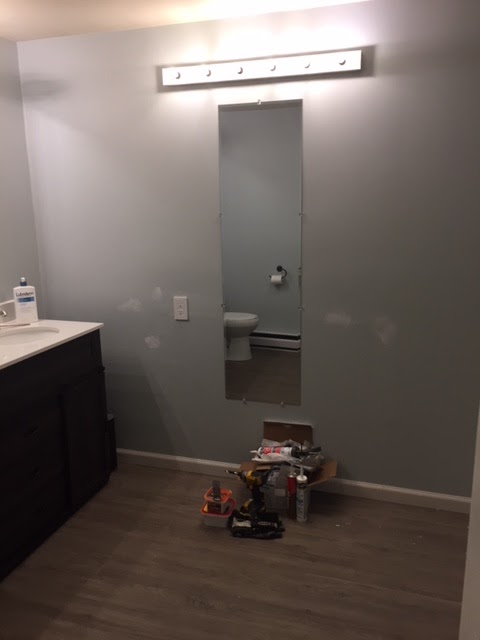
I regret that I don't have the time to find "before" pictures right now, and also obviously I haven't cleaned anything prior to snapping these pics, but I've been promising and update on the awesome work My Prince has been doing on the Master Bathroom and if it doesn't go up now it never will. So, without further ado, here we go!
Showing posts with label house projects. Show all posts
Thursday, May 17
Tuesday, April 17
The Hall Bathroom
Generally speaking, March is not a great month around here. It tends to be associated with stir-craziness and an antsy impatience to be working on the year's house/property projects.
(Example: several years ago, we went to Lowes for closet doors and came home with lovely bamboo flooring. We then proceded to stay up ludicrously late ripping out the carpet in our bedroom and replacing it with the aforementioned flooring... and then still had to go back to Lowes for the closet doors we had intended to buy the first time around.)
This year, we had enough else going on that we mostly avoided the usual March impulse-project. We did do a bunch of online searching and shopping for a project that's been on the list, though - replacing the floor in the bathrooms. It's pretty obvious that when the house was built the previous owners just grabbed whatever flooring was cheap and available and used it, because there wasn't any sort of rhyme, reason or taste involved. The hall bathroom has been painted since I think the first year we moved in, and we've done little bits and pieces in the intervening time - replaced the showerhead, put in a window, painted the vanity, cleaned up the trim, replaced the mirror.
Recently, while I was elbow deep in writing for work, My Prince replaced the floor. My photos don't do it justice (they never do), but it's lovely! It's greyish slate kind of shade and looks very clean and soothing with the blue walls. The new trim is specially designed for bathrooms, so it's durable and moisture resistant which is awesome!
While he was at it, My Prince did me a huge favor and put some peel-and-stick tile down inside the bathroom vanity cabinet. (I didn't take a picture because I couldn't make the lighting work.) This sounds dumb, but it makes a huge difference! Because of the way the vanity is constructed and the way the lighting is, even when the inside of the cabinet was scrubbed and clean it still didn't ever really *look* clean. With the new, light-colored tile it's now brighter, quicker to clean and actually looks clean! Small change, big improvement!
(Example: several years ago, we went to Lowes for closet doors and came home with lovely bamboo flooring. We then proceded to stay up ludicrously late ripping out the carpet in our bedroom and replacing it with the aforementioned flooring... and then still had to go back to Lowes for the closet doors we had intended to buy the first time around.)
This year, we had enough else going on that we mostly avoided the usual March impulse-project. We did do a bunch of online searching and shopping for a project that's been on the list, though - replacing the floor in the bathrooms. It's pretty obvious that when the house was built the previous owners just grabbed whatever flooring was cheap and available and used it, because there wasn't any sort of rhyme, reason or taste involved. The hall bathroom has been painted since I think the first year we moved in, and we've done little bits and pieces in the intervening time - replaced the showerhead, put in a window, painted the vanity, cleaned up the trim, replaced the mirror.
| The old floor (and my terrible picture-taking skills). |
| The old trim. |
| Beautiful new floor and new trim!! |
Saturday, March 17
March (So Far) in Pictures
While I've been pouring every ounce of energy I've got (after dealing with snow) into mastering my writing job and keeping up with the workload, my Prince has been cranking out absolutely amazing projects! Within days of getting home in January he was grinding away at the basement insulation project. I was (and remain) flabbergasted at how fast he got studs up, insulation and sheeting in, drywall installed, mudding done, and then the whole wall (the entire length of the house!) primed and painted. The photo above is the primed version. Because I'm in a hurry and not interested in scrouging up a photo of the finished product, imagine it a bright, spotless white! It makes the entire space look huge and gorgeous. I'm glad one of us is getting things done these days!!
Friday, December 15
New Shower Set Up
Our house has two bathrooms. We took the tub out of the master bathroom a couple years ago while we had a giant dumster here for another project since we knew it was going to have to eventually get replaced anyway.
Between that, the stupidly damp/cold/awful weather we've had pretty consistently the last two years, and the fact that we're both working full time and don't want to spend every spare minute we're home cleaning (to keep up with the effects of said gross weather), we decided a while ago to just turn off the water to the shower in the master bath and use the tub/shower combo in the hall bath instead. It worked out really well... until the fixtures in the tub/shower combo started leaking.
It wasn't an emergency situation, but it did force us to start looking at replacement options. My Prince is wonderful and did lots of research, and then we examined our options on both the design side of things and the "how much of a pain is this going to be to install" side of things... because this house was very definitively NOT designed with ease of replacement/upgrades in mind. We ended up going with a Peerless dual-shower-head fixture. (In no small part because I feel like every house should have at least one movable shower head for the washing of pets, small children, and the like. Simply as a practical matter.)
Then, recently, on a day that My Prince was home and I was at work, he got the entire thing installed! I came home and it was all done and beautiful! (Much nicer than my sad photography skills can convey.) It felt like an extra victory, sneaking in one more house project under the deadline before we roll into 2018, and blessedly one less thing to worry about over the winter when everything seems harder. I'm very grateful for talented people like My Prince who can handle projects like that, and quite pleased with the results!
Between that, the stupidly damp/cold/awful weather we've had pretty consistently the last two years, and the fact that we're both working full time and don't want to spend every spare minute we're home cleaning (to keep up with the effects of said gross weather), we decided a while ago to just turn off the water to the shower in the master bath and use the tub/shower combo in the hall bath instead. It worked out really well... until the fixtures in the tub/shower combo started leaking.
It wasn't an emergency situation, but it did force us to start looking at replacement options. My Prince is wonderful and did lots of research, and then we examined our options on both the design side of things and the "how much of a pain is this going to be to install" side of things... because this house was very definitively NOT designed with ease of replacement/upgrades in mind. We ended up going with a Peerless dual-shower-head fixture. (In no small part because I feel like every house should have at least one movable shower head for the washing of pets, small children, and the like. Simply as a practical matter.)
Tuesday, October 24
Finishing the Stairwell
Theoretically, this hasn't been a big year for house projects. We've focused our time and energy other places more in 2017 than we have since before we bought the house! That said, there have been a few projects and they've definitely made a difference. One of them was the stairwell we had put in out front.
Back in June, I posted about getting the stairs put in. They looked like this:
We knew at some point before winter they'd need to be stained, but they needed to settle in and fully dry out first. Then things got busy and there was traveling, and time lapsed. This past week, aware that the end of October approaches and time is short, we made time to finish them. My Prince did the hard stuff - the big, sweeping areas where it would be really noticeable if it were uneven, etc., as he's by far the more talented of the two of us when it comes to such things. The next day, I carved out time to do all the little spindles and other odd spots. Now, they look like this:
They pretty much perfectly match our front porch. Combined with the stone walkway we built to connect them, they give the front yard a coordinated, rusticly lovely look that is lightyears away from the haphazard weirdness that existed when we bought the place.
For all that we're prone to looking at things through the eyes of homeowners (always looking ahead to the next project, or aware of how much *could* be done), it is really nice to step back once in a while and genuinely appreciate the massive ways we've reshaped our property and give ourselves proper credit for work well done.
Back in June, I posted about getting the stairs put in. They looked like this:
We knew at some point before winter they'd need to be stained, but they needed to settle in and fully dry out first. Then things got busy and there was traveling, and time lapsed. This past week, aware that the end of October approaches and time is short, we made time to finish them. My Prince did the hard stuff - the big, sweeping areas where it would be really noticeable if it were uneven, etc., as he's by far the more talented of the two of us when it comes to such things. The next day, I carved out time to do all the little spindles and other odd spots. Now, they look like this:
They pretty much perfectly match our front porch. Combined with the stone walkway we built to connect them, they give the front yard a coordinated, rusticly lovely look that is lightyears away from the haphazard weirdness that existed when we bought the place.
For all that we're prone to looking at things through the eyes of homeowners (always looking ahead to the next project, or aware of how much *could* be done), it is really nice to step back once in a while and genuinely appreciate the massive ways we've reshaped our property and give ourselves proper credit for work well done.
Monday, August 28
Why It Occasionally Sucks to Be Conscientious
![]() |
| How NOT to do the sub-flooring over a split-line in your house. |
Accordingly, one of our fairly early projects (once we'd finished all the usual unexpected surprise kinds of things you have to do once you buy a new house) was to rip all of the carpet and vinyl out and put down pre-finished hardwood in the whole of the kitchen, dining room, living room, and hallway. We went with a gorgeous warmly-colored hickory in fairly wide planks that we paired with an equally warm, wheat-colored paint, transforming the space into something we have been proud of and delighted in. Part of the reason for choosing hickory was that it's all but indestructible; you could drive a tank over our floor and it would probably have been fine... a desirable trait in a house that's going to see lots of mud and border collies.
Unfortunately, as time went on, we discovered that we were getting a serious swelling/gap problem. In the winter, the floor shrank and we got a distinct gap between the planks along the center of the house. In the summer, the planks swelled, pushing up in a peak at the some point. Research (and some exploring when we ripped up the flooring the bedrooms to put engineered bamboo down in there) revealed that when our house was put together, the idiots in charge (true to form) didn't use their heads. Instead of laying the sub-floor ACROSS the split line, they laid it out from either side of said line... ugh. Despite doing everything we could without taking the floor up, it eventually became obvious that that floor was going to have to come up and be redone from at least several feet to one side of the split line to the far wall.
![]() |
| Bridging the gap... how the split line SHOULD look. |
Needless to say that was NOT a project we wanted to do. We'd put the floor down with the intention of only having to do it once... aka a lot of blood, sweat, tears, and T-nails. Finally, this year, other things being what they are, Eric decided the floor simply had to get done. We waited until the height of summer when everything was as humid as it was going to get (and it was stupidly humid this year!!), then he took the floor up. (Thank God for brilliant and incredibly organized men, right? His system was incredible!)
Once everything was up, he cut out a chunk of the subfloor and put in a new chunk the way it should have been done in the first place. While he was taking everything out, we decided to open up the pillar in the center of the archway between the living room and dining room/kitchen. It was noticeably out of square, and we were pretty sure it was at least half hollow (and therefore pointless).
Yup. Not only was it half hollow (why?!?), but:
(a) It wasn't a solid pillar. It was a bunch of pieces of lumber bolted together. Technically, it does the job but it seems like more work than just getting to industry-standard single pillar and just using that instead.
(b) They never put a proper bracer under it, so it was resting directly on the subfloor. Not real bright, guys...
(c) The header on one side isn't supporting anything... it's just there, and stops before it reaches the center. Again, structurally it doesn't matter, but it really doesn't make any sense. At all.
On the bright side, with the unnecessary extra removed, the space opened up and we're getting a lot more light now! It will also make it easier to square what remains off so it no longer looks cock-eyed.
|
It was a terrible project that Eric did entirely by himself. (All I did was try to keep up on vacuuming and such so that we didn't lay the floor over a permanent bed of sawdust.) I am incredibly grateful to have such a talented and conscientious husband, and very happy to have this project (and all the dread associated with it) off the to-do list!!
As someone who has now done it two different ways (and redone it unwillingly, once), here are my top suggestions for putting down wood flooring in a house:
1. Use engineered wood - bamboo is great! We heard a lot a bad things about bamboo's durability when we were initially making our choices, but we put it down in all the bedrooms and have been extremely impressed and pleased with it's look, feel, function, and durability. (And it's way cheaper than something like hickory!)
| More lack of logic and common sense from the morons who built our house. |
3. Plank width matters. Shoot for something not too narrow, but also not too wide. (Helpful, I know.) But trust me. Do you homework here, because it will make a much bigger difference than you think to a lot more than just aesthetics.
4. Don't get pre-finished hardwood. They tell you it's easy to clean. It isn't. If you want pre-finished, go with engineered. I don't know why, but it's so much better/easier to maintain.
Anybody else got house projects on the mind before Fall/Winter hit?
Monday, June 19
New Stairs!
When we moved into our house five years ago, it was abundantly clear that the primary driving factor for where the previous owners had located things could be summed up in one word: convenience.
Nothing was square to anything else, nothing was intentionally aligned with the road, the path of the sun, or pretty much anything else you might logically expect. The randomness of their choices was perhaps most glaringly evidenced by a set of stairs leading down from the driveway to the front yard... that aligned with exactly nothing. It wasn't near the garage, or the front door, or anything.
After trekking through the driveway and yard back and forth every time for a while (there were bigger fish to fry first, as anyone who has ever moved or bought a house knows), we made a point that first year of moving those stairs across the yard to line up as closely as possible to both the garage and the house.
For five years, our impromptu adjustment held. But the stairs weren't particularly well built to begin with, and in the last year or so they've started to show their age in ways that leaned toward the unsafe. This year, replacing them was a priority. Because there are so many code-related details involved in stairs, it wasn't worth doing it ourselves. We called the guy who built our beautiful front deck, and he agreed to make us a matching stairway.
It was supposed to take one day. It took three very long ones. But, in the end, the results were perfect: safe, lovely, and pretty much designed to last forever.
And, with that, the last of our major house projects are done for the year. Which is good, because goodness knows there's enough else going on!! : )
Nothing was square to anything else, nothing was intentionally aligned with the road, the path of the sun, or pretty much anything else you might logically expect. The randomness of their choices was perhaps most glaringly evidenced by a set of stairs leading down from the driveway to the front yard... that aligned with exactly nothing. It wasn't near the garage, or the front door, or anything.
![]() |
| The front porch, just after completion. |
For five years, our impromptu adjustment held. But the stairs weren't particularly well built to begin with, and in the last year or so they've started to show their age in ways that leaned toward the unsafe. This year, replacing them was a priority. Because there are so many code-related details involved in stairs, it wasn't worth doing it ourselves. We called the guy who built our beautiful front deck, and he agreed to make us a matching stairway.
| Our gorgeous new stairs (and one of my furry supervisors, who approves this post.) |
| The local shale and river stone walkway connecting the stairs to the front porch. |
It was supposed to take one day. It took three very long ones. But, in the end, the results were perfect: safe, lovely, and pretty much designed to last forever.
And, with that, the last of our major house projects are done for the year. Which is good, because goodness knows there's enough else going on!! : )
Tuesday, March 14
Persnickety Paint
When we lived in apartments (for years and years), one of my biggest frustrations was that everything was white. (Or, in a few cases, just primer - but hey, close enough, right?)
It was just so... bland. I'm a warm neutrals kind of person when it comes to wall colors. I want my space to feel warm when I walk in, and that just never happens in apartments unless you're allowed to paint - which you usually aren't.
It wasn't until we got this house that I appreciated exactly how absurdly difficult picking paint colors can be. As with most things, I blame that on the morons who built the house initially... because they lined it up with exactly nothing. Not the driveway, not the road, not the prevailing sunlight. Zilch.
Ergo, when trying to pick the first few paint colors we used here, I discovered that the weird natural light we get makes the same paint look completely different on adjacent walls. Inevitably, a color works on one wall and looks atrocious on another... which makes it really hard to choose a good one!
I was reminded of this again recently when I undertook an attempt to find a paint color for the master bathroom. We're not redoing it yet, but there are a lot of components involved and we want to be ready to hit the ground running when everything else comes together. Seeing as it's March and Winter decided to kick us hard one last time, it seemed like a good time to do research. Which translated into paint samples and frustration and then, finally, success!
The winner? Valspar's Sea Salt Blue... which is actually a very light (but not pastel) sea green. (Bottom right in the pic above, although it doesn't really show very well, there.)
Cross one more thing off the To Do list... and, hopefully, the last time I'll have to choose paint colors for a long time!
It wasn't until we got this house that I appreciated exactly how absurdly difficult picking paint colors can be. As with most things, I blame that on the morons who built the house initially... because they lined it up with exactly nothing. Not the driveway, not the road, not the prevailing sunlight. Zilch.
Ergo, when trying to pick the first few paint colors we used here, I discovered that the weird natural light we get makes the same paint look completely different on adjacent walls. Inevitably, a color works on one wall and looks atrocious on another... which makes it really hard to choose a good one!
I was reminded of this again recently when I undertook an attempt to find a paint color for the master bathroom. We're not redoing it yet, but there are a lot of components involved and we want to be ready to hit the ground running when everything else comes together. Seeing as it's March and Winter decided to kick us hard one last time, it seemed like a good time to do research. Which translated into paint samples and frustration and then, finally, success!
The winner? Valspar's Sea Salt Blue... which is actually a very light (but not pastel) sea green. (Bottom right in the pic above, although it doesn't really show very well, there.)
Cross one more thing off the To Do list... and, hopefully, the last time I'll have to choose paint colors for a long time!
Tuesday, May 24
Spoiled Again
After spending most of last weekend outside doing yard-related projects like planting our garden (hooray!), we started this week by tackling an indoor project. By we, of course, I mostly mean my talented husband again. (I just helped with the cleaning parts.)
I've long been wishing for a table/shelf surface over the washer and dryer in the laundry room. As is usually the case, there's been just enough room to drop things between and behind the machines... but not enough to easily retrieve them. Also, the contoured surfaces of the machines made them natural dust magnets.
So, after a little ingenuity, a lot of measuring, and some patience, look what he made for me! Isn't it beautiful? My picture really doesn't do it justice. It fits flawlessly snugly, is a snap to clean, and reflects the light so the entire space feels brighter. I'm extremely happy with it, and just had to show it off. It's good to be spoiled! : )
I've long been wishing for a table/shelf surface over the washer and dryer in the laundry room. As is usually the case, there's been just enough room to drop things between and behind the machines... but not enough to easily retrieve them. Also, the contoured surfaces of the machines made them natural dust magnets.
So, after a little ingenuity, a lot of measuring, and some patience, look what he made for me! Isn't it beautiful? My picture really doesn't do it justice. It fits flawlessly snugly, is a snap to clean, and reflects the light so the entire space feels brighter. I'm extremely happy with it, and just had to show it off. It's good to be spoiled! : )
Monday, May 16
Where Do I Apply for Global Warming?
![]() |
| Our newly expanded rhubarb bed. Two mature plants on the right, two new ones on the left. |
I keep hearing about it. It's in the news, discussed at massive international seminars and conventions, and giving all kinds of environmentally conscious people serious heartburn.
But for all the fuss, I am displeased to report that it's May and it snowed here. Not the beginning of May, the ides of May. And not just a little flurry - a full bore, whirling-snow-everywhere-to-practically-white-out-conditions snow that stuck to the garage roof and the porch until the sun came up the next morning.
As someone who has fruit trees already starting to show green and thinking just beginning to blossom, this nonsense is unacceptable! We know better than to try to plant our garden proper before Memorial Day, but there's nothing we can do about timing of the trees or the rhubarb plants.I will not be a happy camper if we lose our chance to get fruit because of unreasonably crazy weather patterns.
So if anyone knows where I can apply for global warming and get some proper spring-heading-for-summer weather out here, please let me know.
![]() |
| Our new asparagus bed! Fully planted, but not yet sprouting anything noticeable. Exciting anyway. |
Friday, April 22
Syruping & The Hole Project
Exhibit A: Syruping
I'd pretty much decided by the end of March that we weren't going to
get any maple syrup this year. Between the random spikes in
temperature and prompt re-freezes, it looked like the trees were
going to bud (and make the sap bitter) before we got the proper
temperature spread we needed to get decent flow.
Fortunately, my husband is more optimistic than I am and realized
that we had a second chance in the beginning/middle of this month.
The temperatures fell into line, we threw taps and buckets on the
trees, and spent two weeks boiling down sap. Voila! Maple syrup! We
got an outsdoor burner in a different style this year which made a
big difference, and I'm very pleased both that we got a generous
amount of syrup and that we learned some new things that will be
useful in the future about expanding our production.
Exhibit B: The Hole Project
We've got a number of projects lined up that the tractor will play an
essential role in, of course, aside from the standard things like
snow management every winter. One of our more pronounced projects
underway at the moment is stump removal. We've been steadily taking
down trees that were fall hazards to the house or that seriously
impeded light to the house/garden areas of the yard since we moved
in. Not surprisingly, this has resulted in a generous number of
stumps hanging around that we'd like to also remove. If you've ever
tried to dig a stump out by hand, however, you'll appreciate what a
daunting, time-consuming, and often back-breaking process that can
be. Compliments of the Kubota, it's getting a lot easier!
This is the current progress on an absolutely enormous and stubborn
stump in the back yard. It's still too heavy/too solidly connected to
rip out, but with a little more time digging it'll be gone, opening
up valuable yard space for other things.
Spring/Summer weekends are going to be even more precious and packed
than usual this year, but it's encouraging to finally feel like we're
off to a really good start on all the things we hope to get done
around the property.
Wednesday, November 18
What's Cooking
| My not-very-good picture of our beautiful new oven! |
When we bought our house, it was
abundantly clear that the previous owners' use of the kitchen pretty
much began and ended with the fridge. The stovetop range and oven
were in fair condition, but definitely not selected or maintained by
anyone who loved to cook. That wasn't a big deal, and we just made a
mental note that everything would have to get replaced sooner or
later.
We replaced the dinosaur of a fridge
first, upgrading to a much smaller (and far more efficient) model.
Then we traded in the stovetop, again getting a much more efficient
(and better designed) model. The double wall oven started going on
the fritz well over a year ago, but I chose to strategically ignore
and work around it. First the top oven stopped heating up to anything
over 200 degrees. So I switched to solely using the bottom one. When
the thermometer kicked and the oven temp stopped having any relation
to what was on the dial, we got a small in-oven thermometer and I
just used that to calibrate to the right temp. That worked quite
nicely (most of the time), until a few weeks ago.
When the heater coil on the bottom
oven arced and caught fire, I cried uncle and stopped putting off its
replacement. Because the oven was a weird size (as so many things
randomly seem to be in this house), we had to order the replacement
and wait for it to come in. Since I saw no point in paying stupid
amounts of money for another self-cleaning double oven when I'd
gotten along just fine with one for so long, we went with a single
oven this time. Thanks to My Prince's excellent skills (and a bit of
luck), we did not end up
having to dismantle the entire cabinet built around the oven as I'd
feared might be the case. Instead, he was able to shave the edges of
the opening a smidge and then slide the new oven right in. Isn't it
pretty?!
The
fact that it's smaller is actually going to work out to be a bonus,
because the additional space will get framed in and become cabinet
space. While I'm extremely efficient with my kitchen space and don't
technically need it, cabinets are a huge selling point so the extra
will be in our favor someday when it's time for us to move on from
here.
To
celebrate having an oven that works properly, I made Paleo GingerSnaps. Nom! Now that I
think about it, I'm not entirely sure what ovens are made of, but
maybe we did end up getting each other steel for our anniversary…
Saturday, August 15
Beautiful Bottle Crates
Then I was on Pinterest and saw a photo of a wooden crate
someone had made themselves… and I knew we needed some. I broached the subject
to my handsome and talented Prince, and he agreed to think about it. We were
busy, though, and the project sat on the back burner a while.
When he re-emerged, my Prince was holding a custom-made,
custom-sized crate for our shiny bottles! It is both beautiful and rock solid –
perfectly for carting bottles around and for storing them in style as their
contents ages. He’s made a few more since then, each appropriately sized for a
different style of bottle. I am very fortunate to have a husband who is
creative and talented enough to design and create such awesome things for
us!
Thursday, August 13
If You Get A Dumpster
Have you ever read the book If You Give A Mouse A Cookie?
It’s a children’s book, and the basic storyline goes like this: If you
give a mouse a cookie, he’ll want milk to go with it. That will lead to wanting
another thing, and then another thing, and so on until you find yourself
exhausted six hours later having given the crazy mouse everything but the
kitchen sink.
I think someone should write a sequel for adults called “If You Rent a Dumpster” – because it
seems to work very much the same way! If you’ve already rented a dumpster, and
you’re going to pay the same whether you return it dead empty or stuffed to the
gills, you may as well throw in everything you can think of that will need to
go eventually anyway, right?
Following that logic, while we had a dumpster parked in the
driveway at the beginning of July for our garage roof project we decided to
tackle a few other things that had been “on the list” since we had a little
extra room to fill in the dumpster.
First up: removing the shutters.
We’ve known since our first summer here that wasps liked to
build nests behind the shutters on the two windows on the front of the house.
With the shutters screwed directly into the siding, there wasn’t a lot we could
do except hit them with Raid when we saw activity. So after the garage roof was
knocked out, we grabbed the ladder and screw gun (and Raid!) and set about
getting the shutters pulled down. I can’t begin to tell you what it was like to
watch as the shutters came off and dozens of wasp nests (mostly dead,
thankfully) spilled out from behind them!! I promptly decided that if I ever
have shutters on a house again, they’re going to be real and functional so they
can easily be cleaned behind!
Next up: Ripping out the tub.
Some used exactly zero common sense when setting up our Master
Bathroom. The shower stall is quite small and tucked behind the door, and the
tub was set in a corner alcove created by the shower stall and two walls… which
made sitting in the tub feel a bit like being in a cave, staring at the blank
wall that was the back of the shower. Very strange. We tried it exactly once, at which point I
discovered that (by some quirk of the plumbing) it took forever to fill the tub,
and that I couldn’t make it feel clean no matter how many times I bleached it.
(I blame the tub’s weird 70’s mustard yellow color.)
It was very loud and bit messy, but once we got it ripped
and hauled out, the improvement was impressive! The bathroom now feels huge and
the space is much faster to clean.
(We filled what remained of the dumpster space with odds and
ends we’ve collected off the property that needed to go, and are quite pleased.)
Thus ends my cautionary tale: if you get a dumpster, be prepared to get a head start on other
projects – because once you’ve got it, you’ll be compelled to fill it!
Subscribe to:
Posts (Atom)